In a previous blog I discussed using tcl to create a simple script to ping multiply IP addresses from a Cisco router. (http://garnersguides.blogspot.co.uk/2012/08/some-clever-ping-tricks.html)
In this blog I have embed a video I created which describes a variation to the original script using a conditional loop.
If you have any questions, please feel free to ask me.
Friday, 7 September 2012
Wednesday, 29 August 2012
Creating multiple Loopback addresses using a Tcl script
In a previous blog, (Some clever PING tricks) I discussed using Tcl to create PING scripts to ping multiple hosts. This got me thinking, what other cool applications can I demonstrate using Tcl.
The first thing to spring to mind was creating multiple Loopback addresses. The aim of this blog is to discuss how to create multiply Loopback addresses on a router using a Tcl script.
"Why would you want to create loads of loopback addresses?" I hear you ask...
When testing routing protocols in a lab environment (Especially BGP) it is good to have plenty of routes in your routing table. Rather than create loads of routers in GNS3, or fill a rack with kit you don't need, it is easier to simulate other networks using Loopback address on a Router and then add them to our routing protocol. That's not the objective of this blog, this blog is to discuss how to create them.
As with the PING script, I will start by saying you could write all your loopbacks in a word document, and then cut them into your router, but doing it this way, only takes one line of code. (although, I may split it up to make it easier to understand).
The last PING script used the for command to create what in programming terms is called a Control Flow Loop.
The correct syntax is;
for init test body
Or if we display this in a Tcl command it would look like this;
for { init } { test } { next } {
Look familiar?
for { set i 1 } {$i <= 9 } {incr i } {
ping 10.0.0.$i re 10 si 1500 so lo0 df-bit
}
This was our last PING script in the last blog.
By changing our variable, and adapting the body we can use this loop to create our loopback addresses.
for { set i 0 } {$i <= 255 } { incr i } {
So what I've done now is "set" "i" (our variable) at 0.
The conditional test is to make sure "i" is less than 255. We can't have an octet in a IP address greater than 255.
We then increment "i" by one each time the loop is run.
Finally we use the "puts" command to send data to the router.
As we are now using configuration commands on our router so we need to use "ios_config" rather than the "exec" we used in our other PING script.
The commands should be self-explanatory;
ip address 10.255.$i.255 255.255.255.255 Is to create the IP address. I have chosen to put our variable in the third octet, but in theory we could place it in different octets, or even in several octets.
We can test our script by looking at our interfaces with the "show ip interface brief" command;


Voila!
I hope this blog has been of interest, and helped you understand a little more about the power of scripting!
The first thing to spring to mind was creating multiple Loopback addresses. The aim of this blog is to discuss how to create multiply Loopback addresses on a router using a Tcl script.
"Why would you want to create loads of loopback addresses?" I hear you ask...
When testing routing protocols in a lab environment (Especially BGP) it is good to have plenty of routes in your routing table. Rather than create loads of routers in GNS3, or fill a rack with kit you don't need, it is easier to simulate other networks using Loopback address on a Router and then add them to our routing protocol. That's not the objective of this blog, this blog is to discuss how to create them.
As with the PING script, I will start by saying you could write all your loopbacks in a word document, and then cut them into your router, but doing it this way, only takes one line of code. (although, I may split it up to make it easier to understand).
The last PING script used the for command to create what in programming terms is called a Control Flow Loop.
The correct syntax is;
for init test body
Or if we display this in a Tcl command it would look like this;
for { init } { test } { next } {
body
}
Look familiar?
for { set i 1 } {$i <= 9 } {incr i } {
ping 10.0.0.$i re 10 si 1500 so lo0 df-bit
}
This was our last PING script in the last blog.
By changing our variable, and adapting the body we can use this loop to create our loopback addresses.
for { set i 0 } {$i <= 255 } { incr i } {
puts [ ios_config "interface loopback$i" "ip address 10.255.$i.255 255.255.255.255" ]
}
So what I've done now is "set" "i" (our variable) at 0.
The conditional test is to make sure "i" is less than 255. We can't have an octet in a IP address greater than 255.
We then increment "i" by one each time the loop is run.
Finally we use the "puts" command to send data to the router.
As we are now using configuration commands on our router so we need to use "ios_config" rather than the "exec" we used in our other PING script.
The commands should be self-explanatory;
interface loopback$i Is the IOS command to create a loopback interface. We use "$i" our variable to change the loopback each time the script loops.
ip address 10.255.$i.255 255.255.255.255 Is to create the IP address. I have chosen to put our variable in the third octet, but in theory we could place it in different octets, or even in several octets.
(I.E. 10.255.$i.$i)
So lets test our script.

We can test our script by looking at our interfaces with the "show ip interface brief" command;
No point showing all 255 loopbacks, but just to prove I didn't cheat, here is the end of that show ip interface brief command;
Voila!
Our script worked and we have just created 255 loopbacks with a single line of Tcl scripting.
I hope this blog has been of interest, and helped you understand a little more about the power of scripting!
Tuesday, 28 August 2012
Tip for remote working on Cisco devices.
It's not uncommon to find yourself working of Cisco devices remotely. Recently I have been working on a project where the Cisco hardware has been all over the planet.
When configuring equipment remotely, you should always make sure you're not going to cut off your remote connection. Even the most experienced Engineer can inadvertently isolate a router or switch.
And sometimes, it can take a while to get some on site assistance.
One method I have employed involves using the reload command.
Before describing the process it is important to understand that this tip should only be employed on hardware which does NOT have live traffic on it. Or if it has, make sure you complete your changes in a correct outage window.
So the tip… use the reload command!
The 'reload' command is self-explanatory, but it can also be used with a timer.
You can set the reload to happen at a predefined date\time as shown below;

The command is "reload at TI:ME Day Month" or "reload at TI:ME Month Day".
You can then add a text message for the reason. In my example I used "*** Scheduled reload by Mike ***".
To cancel you're scheduled use the "reload cancel" command.
Obviously waiting 13hours for our reload is not ideal, so the version I prefer is the "reload in mmm" command shown below;
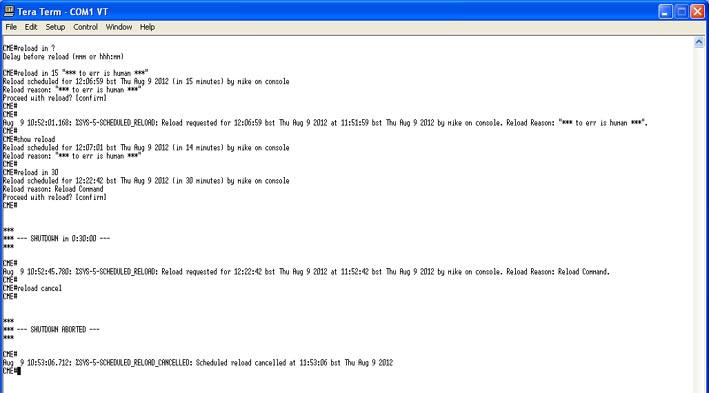
My first example was to get the router to reload in 15 minutes. "reload in 15 TEXT MESSAGE HERE"
You can check the reload with the "show reload" command.
If you need to extend your reload time, you can simply use the command again with your new time frame. I.E. "reload in 30"
As before, you can cancel it with the "reload cancel" command.
Remember to save your configuration after you've made any changes… and DON'T forget to cancel the reload if it isn't required!
One last tip, don't accidentally type reload and hit return several times… can be a costly mistake!
"From the errors of others, a wise man corrects his own." ~Syrus
When configuring equipment remotely, you should always make sure you're not going to cut off your remote connection. Even the most experienced Engineer can inadvertently isolate a router or switch.
And sometimes, it can take a while to get some on site assistance.
One method I have employed involves using the reload command.
Before describing the process it is important to understand that this tip should only be employed on hardware which does NOT have live traffic on it. Or if it has, make sure you complete your changes in a correct outage window.
So the tip… use the reload command!
The 'reload' command is self-explanatory, but it can also be used with a timer.
You can set the reload to happen at a predefined date\time as shown below;
The command is "reload at TI:ME Day Month" or "reload at TI:ME Month Day".
You can then add a text message for the reason. In my example I used "*** Scheduled reload by Mike ***".
To cancel you're scheduled use the "reload cancel" command.
Obviously waiting 13hours for our reload is not ideal, so the version I prefer is the "reload in mmm" command shown below;
My first example was to get the router to reload in 15 minutes. "reload in 15 TEXT MESSAGE HERE"
You can check the reload with the "show reload" command.
If you need to extend your reload time, you can simply use the command again with your new time frame. I.E. "reload in 30"
As before, you can cancel it with the "reload cancel" command.
Remember to save your configuration after you've made any changes… and DON'T forget to cancel the reload if it isn't required!
One last tip, don't accidentally type reload and hit return several times… can be a costly mistake!
"From the errors of others, a wise man corrects his own." ~Syrus
Some clever PING tricks
As a Network Engineer, using PING is something that you can sometimes take for granted. We probably all use it, for basic troubleshooting, and never really give it much of a thought.
The aim of this blog is to have a think about PING, and show some clever tricks I have employed using PING on Cisco routers.
Most people who use PING simple use the simplest form; PING <IP address> as shown below;

As you can see from the image above, a basic PING sends 5 ICMP echo requests which are 100 bytes in size.
Sometime people may change this by using an extended PING.
You need to be in privileged EXEC mode to use the extended PING commands. Just type "ping" and press return to start an extended ping as shown below;

As you can see from the above image, with the extended PING we have sent 10 ICMP echo requests which were 1500 bytes in size.
We also changed our timeout to 5 seconds.
Using extended PINGs is well known, and probably as far as most people take PING.
However, since IOS12.x Cisco has made the extended PING commands available in a single command.
We can repeat the above example in one command "ping ip 10.0.0.1 repeat 10 size 1500 timeout 5" as shown below;

By default, the PING will adopt the IP address of the interface from which it leaves the router. Sometimes we want to change this (like when pinging within a particular VLAN you would adopt the source interface of the sub-interface associated with that VLAN). This is also done using extended pings, but now we've learn't to complete extended pings in a single line, lets demonstrate it;

So as you can see from the image above, this PING was sent from our router using the IP address of Loopback 0 or 1.1.1.1
When using a source port for your PINGs it is important to consider your routing tables. Just because you have a route to your destination... does your destination have a route back to your source port?
The aim of this blog is to have a think about PING, and show some clever tricks I have employed using PING on Cisco routers.
Most people who use PING simple use the simplest form; PING <IP address> as shown below;
As you can see from the image above, a basic PING sends 5 ICMP echo requests which are 100 bytes in size.
Sometime people may change this by using an extended PING.
You need to be in privileged EXEC mode to use the extended PING commands. Just type "ping" and press return to start an extended ping as shown below;
As you can see from the above image, with the extended PING we have sent 10 ICMP echo requests which were 1500 bytes in size.
We also changed our timeout to 5 seconds.
Using extended PINGs is well known, and probably as far as most people take PING.
However, since IOS12.x Cisco has made the extended PING commands available in a single command.
We can repeat the above example in one command "ping ip 10.0.0.1 repeat 10 size 1500 timeout 5" as shown below;
By default, the PING will adopt the IP address of the interface from which it leaves the router. Sometimes we want to change this (like when pinging within a particular VLAN you would adopt the source interface of the sub-interface associated with that VLAN). This is also done using extended pings, but now we've learn't to complete extended pings in a single line, lets demonstrate it;
So as you can see from the image above, this PING was sent from our router using the IP address of Loopback 0 or 1.1.1.1
When using a source port for your PINGs it is important to consider your routing tables. Just because you have a route to your destination... does your destination have a route back to your source port?
Just to round up on extended PING's, another useful command is the DF-bit. this can be used to ensure your PING does not get fragmented.
On Ethernet interfaces, the maximum MTU size is usually 1500 bytes. We can check this with the "show interface fastethernet 0/0" command;
FastEthernet0/0 is up, line protocol is up
Hardware is Gt96k FE, address is c000.1400.0000 (bia c000.1400.0000)
Internet address is 192.168.0.1/30
MTU 1500 bytes, BW 100000 Kbit/sec, DLY 100 usec,
reliability 255/255, txload 1/255, rxload 1/255
Encapsulation ARPA, loopback not set
Keepalive set (10 sec)
Full-duplex, 100Mb/s, 100BaseTX/FX
So in theory the maximum size packet we can send with out using fragmentation is 1500 bytes.
We can check this using extended PING's as shown below;

Our first PING has a MTU size of 1500 bytes, which we would expect to work without the need for fragmentation.
Our second PING has a MTU of 1501 bytes, which has exceed the maximum allowed on the interface. Therefore in order for this PING to be successful, we would need to fragment it. Which is exactly what the router will do, and is why this PING also works.
In our final PING we have enabled the "df-bit" which basically tells the router do not fragment me. We've also made sure the MTU is above 1500 bytes. Therefore this PING fails as it is too large for the interface, and can't be fragmented.
So now for the clever bit;
Since IOS 12.3(2)T Cisco routers have introduced Scripting with Tcl. What has this got to do with PING I hear you ask....
Well we can use Tcl to write PING scripts to PING multiple destinations, and using what we've just learn't above, we can do clever extended PINGs.
Let's assume we want to PING 9 different devices, we could enter the ping command 9 times with all of our destination addresses. (In fact, that is exactly what I used to do before I discovered Tcl). We could write out our PING commands in a text document, and cut and paste them into our router, but that isn't using Tcl and isn't that clever.
Instead, we can write a short script to do that for us.
Before we look at a PING script, I think it is important to point out a few things we need to considered when scripting (or programming).
puts If your a old enough to remember the BBC basic PC, you may well remember the print command.
In Tcl the puts command does roughly the same thing. It can send a string of data out of a channel. Normally to stdout which to you and I means to the screen.
So our first ever Tcl script should be the classic "hello world!" script.
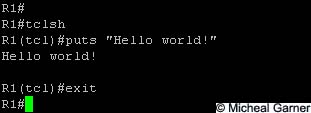
Notice the quotation marks around the Hello world!. These are important, as the command will read the spaces as delimiters.
Congratulations! If your following this blog, you've just written your first Tcl script!
In fact lets create a variable now...
Mikesvariable = 1
Now we've decided what Mikesvariable is (1) lets use it in a small Tcl script.

As you can see, we set our variable with the "set" command.
If we try printing our variable to the screen using the puts command we get the contents of the variable (1).
If we don't put the "$" symbol in front of the variable, we get Mikesvariable.
This is an IMPORTANT programming concept. The $ symbol is used to identify variables.
We can now use what we've learnt to combine the two concepts and re-create our Hello world script like this;

So as you can see, variables can be quite useful.
I don't want to turn this blog into a programming lesson, but I recommend having a good google about using variables, as manipulating them, is what makes scripting such a powerful tool.
The next programming concept we need to quickly cover is loops! We can implement loop a simple loop using the foreach command.
The easiest example I can think of is our first actual PING script.
We need to create a list of IP address's and we want to issue the PING command for each one.
To do this in Tcl, we can start by creating our list of IP addresses. So our script will look like this;
R1#tclsh
R1(tcl)#foreach IPAddress {
+>(tcl)#10.0.0.1
+>(tcl)#10.0.0.2
+>(tcl)#10.0.0.3
+>(tcl)#} { puts [ exec "ping $IPAddress" ] }
What this basic script is doing is creating a list of variables called $IPAddress.
The puts command is the same as in our "Hello world!" script, but is using the contents of the [brackets].
The exec is a command to run Cisco commands with privileged mode characteristics. The inside of the "quotes" is the actual command we're going to use.
So basically the script will enter ping $IPAddress into the cli of the router. The content of the $IPAddress variable will be the contents of our list. The first set of {brackets}.
Which in our example is 10.0.0.1, 10.0.0.2 and 10.0.0.3.
We run our script by pressing enter after the last set of "}"

Voila!
As you can see, we've just run our first example of a simple PING script.
We could adapt our $IPAddress list to match our required IP addresses, and use this script on various routers.
That said, this script isn't using any of our extended PING commands discussed earlier...
So lets rewrite our script to increase our MTU size to 1500 bytes, and to use a Source interface of Loopback 0 and to set the DF-bit so we have a fragment free PING to our three addresses and send 10 PINGs.
R1(tcl)#foreach IPAddress {
+>(tcl)#10.0.0.1
+>(tcl)#10.0.0.2
+>(tcl)#10.0.0.3
+>(tcl)#} { puts [ exec "ping ip $IPAddress rep 10 size 1500 source lo0 df-bit" ] }
+>(tcl)#10.0.0.1
+>(tcl)#10.0.0.2
+>(tcl)#10.0.0.3
+>(tcl)#} { puts [ exec "ping ip $IPAddress rep 10 size 1500 source lo0 df-bit" ] }
Type escape sequence to abort.
Sending 10, 1500-byte ICMP Echos to 10.0.0.1, timeout is 2 seconds:
Packet sent with a source address of 1.1.1.1
Packet sent with the DF bit set
!!!!!!!!!!
Success rate is 100 percent (10/10), round-trip min/avg/max = 20/55/172 ms
Sending 10, 1500-byte ICMP Echos to 10.0.0.1, timeout is 2 seconds:
Packet sent with a source address of 1.1.1.1
Packet sent with the DF bit set
!!!!!!!!!!
Success rate is 100 percent (10/10), round-trip min/avg/max = 20/55/172 ms
Type escape sequence to abort.
Sending 10, 1500-byte ICMP Echos to 10.0.0.2, timeout is 2 seconds:
Packet sent with a source address of 1.1.1.1
Packet sent with the DF bit set
!!!!!!!!!!
Success rate is 100 percent (10/10), round-trip min/avg/max = 20/32/48 ms
Sending 10, 1500-byte ICMP Echos to 10.0.0.2, timeout is 2 seconds:
Packet sent with a source address of 1.1.1.1
Packet sent with the DF bit set
!!!!!!!!!!
Success rate is 100 percent (10/10), round-trip min/avg/max = 20/32/48 ms
Type escape sequence to abort.
Sending 10, 1500-byte ICMP Echos to 10.0.0.3, timeout is 2 seconds:
Packet sent with a source address of 1.1.1.1
Packet sent with the DF bit set
!!!!!!!!!!
Success rate is 100 percent (10/10), round-trip min/avg/max = 16/35/72 ms
Sending 10, 1500-byte ICMP Echos to 10.0.0.3, timeout is 2 seconds:
Packet sent with a source address of 1.1.1.1
Packet sent with the DF bit set
!!!!!!!!!!
Success rate is 100 percent (10/10), round-trip min/avg/max = 16/35/72 ms
Perfect!! As you can see, our script has taken shape, and is really starting to work for us!
Hopefully your now starting to see the advantages, of running PINGs using a Tcl script... but, If your mind works like mine, your probably thinking "well why not just cut and paste all your PING commands into the router and skip all this scripting stuff!" Well to answer that question, let me show you another way of repeating the above script, but using a lot less code, and doing more to our variable;
Hopefully your now starting to see the advantages, of running PINGs using a Tcl script... but, If your mind works like mine, your probably thinking "well why not just cut and paste all your PING commands into the router and skip all this scripting stuff!" Well to answer that question, let me show you another way of repeating the above script, but using a lot less code, and doing more to our variable;
R1#tclsh
R1(tcl)#for { set i 1 } {$i <= 9 } {incr i } {
+>(tcl)#ping 10.0.0.$i re 10 si 1500 so lo0 df-bit }
First of all, instead of using a foreach command, I'm using a for command for my loops.
I'm using increments to increase my variable ($i) and I continue to increase it, as long as it is less than 9.
So effectively, I'm pinging every address from 10.0.0.1 to 10.0.0.9. We could change our variable or increment, and could ping every address in a subnet.
We could also place our variable in a different octet. Ohh the power of scripts!! :-D
Here is a screen shot of the above script entered onto my router;

The last of the PINGS were cut off, but basically two lines of Tcl was enough to complete 9 extended PINGs to different IP addresses.
That is why we're using Tcl, and not just cut and paste!!
I hope you've enjoyed this blog, and found it useful. I also hope I've encouraged you to think a little deeper about how we use simple commands like PING.
Thursday, 19 April 2012
Decrypting Cisco type 7 passwords on a router
It is common knowledge that Cisco type 7 passwords are not secure.
A quick search on Google brings up plenty of websites that will crack the passwords for you, and a few scripts\tools you can run locally to get the type 7 password.
You can also decrypt the password on the router.
The aim of this blog is to describe the process for decrypting a type 7 password on router using just IOS commands.
First create a password on your router which you want to crack.
For my example I have created the password "cisco".
So the running configuration looks like this;
 As you can see from the screen shot above,
to show the password use the "show key chain test" command which will decrypt your
type 7 password key-string.
As you can see from the screen shot above,
to show the password use the "show key chain test" command which will decrypt your
type 7 password key-string.
Remember when creating password on a router to use the "secret" keyword to ensure MD5 is used as type 7 passwords are not designed to be secure!
For further information, please refer to www.cisco.com
A quick search on Google brings up plenty of websites that will crack the passwords for you, and a few scripts\tools you can run locally to get the type 7 password.
You can also decrypt the password on the router.
The aim of this blog is to describe the process for decrypting a type 7 password on router using just IOS commands.
First create a password on your router which you want to crack.
For my example I have created the password "cisco".
So the running configuration looks like this;
password 7 1511021F0725
To
decrypt you password, first enter global configuration, then enter the
command "key chain test" followed by "key 1" then enter "key-string 7
1511021F0725" as shown
below;
Remember when creating password on a router to use the "secret" keyword to ensure MD5 is used as type 7 passwords are not designed to be secure!
For further information, please refer to www.cisco.com
Wednesday, 4 April 2012
Reading a pgp encrypted message from Linux CLI
If you've been following my PGP\GPG blogs, you should now have PGPGPG
installed on your Linux PC.
You will also have generated a PGP key and exported the Public Key, and then created an encrypted message for "Your Mate"
If not, please read the previous blogs installing pgpgpg, exporting public key and Encrypting a message.
All that remains is to read an encrypted message. That is the objective of this blog.
First you need to recieve an encrypted message. For this blog, I have created a message which was encrypted using "Your Name's" public key.
The message was placed in my home folder and was called "secretmessage.txt.asc" as shown below.
Check the contents of the file with the cat command.

As you can see, the content of the file are encrypted.
To decrypt the file use the "gpg --decrypt secretmessage.txt.asc" command.
You will be prompted for the passphrase. Then the encrypted message will be displayed.
Of course this is fine for a short message as shown, but if your message is larger you may want to extract it as a file.
This can be done using the "--output <filename>" command.
I have decrypted the "secretmessage.txt.asc" file again below, but this time I've saved the output to a file called secretmessage.txt.

Notice in the second "ls" there is a new file called "secretmessage.txt".
This is the content of the encrypted file. You can check this using the cat command as shown below.

Remember that this file may contain sensitive information, so storing it as a plain text file might not be a great idea.
I hope these blogs have been of use.
You will also have generated a PGP key and exported the Public Key, and then created an encrypted message for "Your Mate"
If not, please read the previous blogs installing pgpgpg, exporting public key and Encrypting a message.
All that remains is to read an encrypted message. That is the objective of this blog.
First you need to recieve an encrypted message. For this blog, I have created a message which was encrypted using "Your Name's" public key.
The message was placed in my home folder and was called "secretmessage.txt.asc" as shown below.
Check the contents of the file with the cat command.
As you can see, the content of the file are encrypted.
To decrypt the file use the "gpg --decrypt secretmessage.txt.asc" command.
You will be prompted for the passphrase. Then the encrypted message will be displayed.
Of course this is fine for a short message as shown, but if your message is larger you may want to extract it as a file.
This can be done using the "--output <filename>" command.
I have decrypted the "secretmessage.txt.asc" file again below, but this time I've saved the output to a file called secretmessage.txt.
Notice in the second "ls" there is a new file called "secretmessage.txt".
This is the content of the encrypted file. You can check this using the cat command as shown below.
Remember that this file may contain sensitive information, so storing it as a plain text file might not be a great idea.
I hope these blogs have been of use.
Monday, 2 April 2012
Importing a public key to your keyring and creating an encrypted message in Linux CLI
If you've been following my PGP\GPG blogs, you should now have PGPGPG
installed on your Linux PC.
You will also have generated a PGP key and exported the Public Key.
If not, please read the previous blogs installing pgpgpg and exporting public key
This blog aims to explain how to import someone else's key, and then send them an encrypted message.
Before we progress any further, you need to have someones Public Key. This can be acquired by email, downloading of a website, or passed via any means, but it is important that you trust the public key you have is from who you think it is from.
I have acquired a public key from "Your Mate" and have it in my home folder.
 I first check the contents of my Key ring using the "gpg --list-key" command as shown
below.
I first check the contents of my Key ring using the "gpg --list-key" command as shown
below.
If you've been following my blogs in order, you should find the only key you have is the one you've generated.
Import the public key for the person you wish to send the encrypted message to with the "gpg --import keyname" command as shown below. As you can see, the key I imported was called "YourMate.asc"
 You can confirm the key is now on your keyring by repeating the "gpg --list-key" command as shown above.
Notice you now have the "Your Mate" key.
You can confirm the key is now on your keyring by repeating the "gpg --list-key" command as shown above.
Notice you now have the "Your Mate" key.
You can check that you have imported the correct public key by asking the owner to confirm the keys finger print.
This can be done using the "gpg --fingerprint" command to see all your keys fingerprints, or an individual key using any of the variables shown below.
 Obviously, if someone wishes to confirm your public key's fingerprint, you can
complete the same command on your own key as shown below.
Obviously, if someone wishes to confirm your public key's fingerprint, you can
complete the same command on your own key as shown below.
 "Your Name" keys fingerprint has been highlighted above.
If you now trust you have the correct public key you can sign the key to show that you trust the key to belong to "Your Mate". The command to sign a key is "gpg --sign-key Your.Mate@email.com"
By signing other peoples keys, you can set up a ring of trust. Other people may choose to trust a key on the basis of your signiture.
So now for the fun part. We have installed gpg, created our own key, exported our public key to some one, and now we have imported "Your Mate" public key. We are finally ready to encrypted our first message.
In order to remain in CLI, I have created a short text message using "cat" as shown below.
 When using a "cat >" to create a
text file, you need to press "CTRL+D" to exit the redirect.
When using a "cat >" to create a
text file, you need to press "CTRL+D" to exit the redirect.
You could use a text editor like gedit or Vi if you prefer.
You can also use "cat" to check the contents of your file as shown below.
 We now have a text file called message.txt in our home directory.
This file can be encrypted using gpg, but lets first consider what we need.
1) the text file
2) the public key of the recipient
3) to make the file ASCII we need to include the "--armor" command.
The required command should look something like this;
"gpg --recipient Your.Mate@email.com --armor --encrypt message.txt"
So with this information we can encrypt the file as shown below
 Notice we now have a "message.txt.asc" file. This is the encrypted file.
Also notice the orginal "message.txt" file still exists! If this contains sensitive data, it should be removed.
Check the contents of your encrypted file using the cat command as shown below.

You can now send this information via email, or any other method safe in the knowledge that it will only be read by its intended recipient/s
You can encrypt a message to more than one recipient including yourself.
That concludes this blog.
You will also have generated a PGP key and exported the Public Key.
If not, please read the previous blogs installing pgpgpg and exporting public key
This blog aims to explain how to import someone else's key, and then send them an encrypted message.
Before we progress any further, you need to have someones Public Key. This can be acquired by email, downloading of a website, or passed via any means, but it is important that you trust the public key you have is from who you think it is from.
I have acquired a public key from "Your Mate" and have it in my home folder.
If you've been following my blogs in order, you should find the only key you have is the one you've generated.
Import the public key for the person you wish to send the encrypted message to with the "gpg --import keyname" command as shown below. As you can see, the key I imported was called "YourMate.asc"
You can check that you have imported the correct public key by asking the owner to confirm the keys finger print.
This can be done using the "gpg --fingerprint" command to see all your keys fingerprints, or an individual key using any of the variables shown below.
If you now trust you have the correct public key you can sign the key to show that you trust the key to belong to "Your Mate". The command to sign a key is "gpg --sign-key Your.Mate@email.com"
By signing other peoples keys, you can set up a ring of trust. Other people may choose to trust a key on the basis of your signiture.
So now for the fun part. We have installed gpg, created our own key, exported our public key to some one, and now we have imported "Your Mate" public key. We are finally ready to encrypted our first message.
In order to remain in CLI, I have created a short text message using "cat" as shown below.
You could use a text editor like gedit or Vi if you prefer.
You can also use "cat" to check the contents of your file as shown below.
This file can be encrypted using gpg, but lets first consider what we need.
1) the text file
2) the public key of the recipient
3) to make the file ASCII we need to include the "--armor" command.
The required command should look something like this;
"gpg --recipient Your.Mate@email.com --armor --encrypt message.txt"
So with this information we can encrypt the file as shown below
Also notice the orginal "message.txt" file still exists! If this contains sensitive data, it should be removed.
Check the contents of your encrypted file using the cat command as shown below.
You can now send this information via email, or any other method safe in the knowledge that it will only be read by its intended recipient/s
You can encrypt a message to more than one recipient including yourself.
That concludes this blog.
Subscribe to:
Posts (Atom)